
Windows Remote Desktop Connections allows you to connect to a Windows-based PC via the internet or a network.
When you are connected using a Remote Desktop Connection, you can see the host computer’s desktop and access its files and folders as if you were sitting in front of its screen.
To connect to a remote computer, that computer must be turned on, must have a network connection, Remote Desktop Connections must be enabled, you must have network access to the remote computer and you must have permission to connect.
If you run Windows 10 Pro or Enterprise, Windows 8.1 Pro or Enterprise, Windows 7 Professional, Windows 7 Ultimate or Windows 7 Enterprise, you can accept Remote Desktop Connections.
If you are running any other edition of Windows, like Windows 10 Home, Windows 7 Home, you cannot accept Remote Desktop Connections, you can always use a third party service like TeamViewer. (More on this in our next article.)
In this article, you will learn how to enable Remote Desktop Connections on your Windows-based computer so that it can be controlled remotely.
Here is how it is done in Windows 10, Windows 7 and Windows 8.1 using either the Settings feature or the Control Panel on your Windows computer.
Find & enable Remote Desktop Connections using ‘Settings’
If you are using Windows 10, you can launch the Remote Desktop Connection client from the Start Menu.
Open the Start Menu and scroll through the apps list until you find the folder called Windows Accessories.
Click on the Remote Desktop Connection to open it.
You can also use Cortana’s search box from the taskbar.
Type the word “remote” in the search field and click or tap on the appropriate result.
Alternatively, you can click or tap the microphone icon on the same search box and say: “Open Remote Desktop Connection!”.
If you are using Windows 8.1, you can open the Remote Desktop Connection from the Start screen.
Go to the Apps view, look for the Remote Desktop Connection client and click or tap its name to launch it.
You should find it in the “Windows Accessories” folder.
A slightly faster way of starting the Remote Desktop Connection client is to use the Search feature.
To do that, switch to the Start screen and write the word “remote.” Then click or tap the Remote Desktop Connection search result.
In Windows 7, you can also launch the Remote Desktop Connection client from the Start Menu.
Click “All Programs” and navigate to the Accessories group.
There, click the Remote Desktop Connection shortcut.
You can also use the search to find and open the Remote Desktop Connection client.
Find & enable Remote Desktop Connections using Control Panel
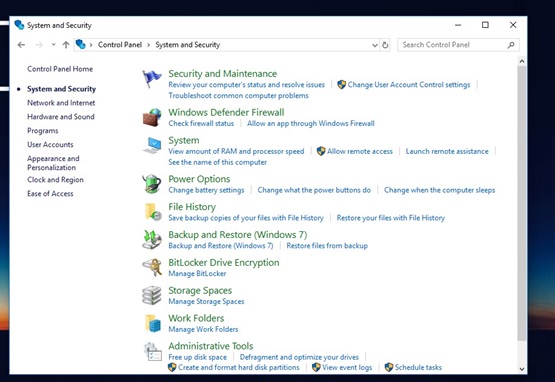
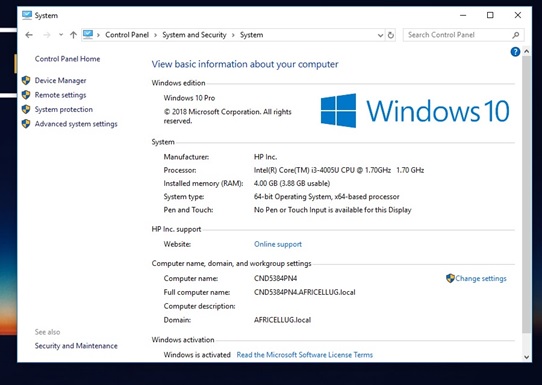
One method to get access to the “Remote Desktop Connections” settings that works the same in all three Windows operating systems is to open the Control Panel; go to control panel “System and Security -> System.”
On the left side of the System window, click on the link called “Remote settings.”
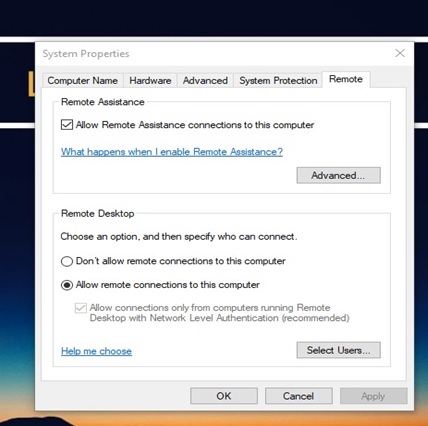
Regardless of the operating system that you use, a window called System Properties is now opened.
On its Remote tab, you can find two sections: Remote Assistance and Remote Desktop.

The screenshot above shows you how the System Properties window looks in Windows 10.
The Windows 8.1 version is the same, but in Windows 7 the options are organized and named slightly differently, as you can see in the following image.
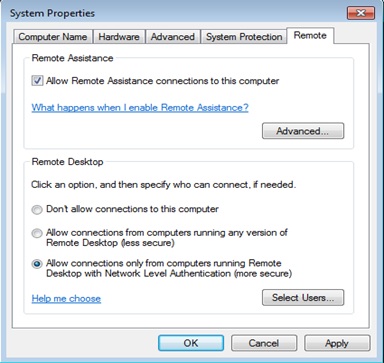
In the Remote Desktop area, you have three options to choose and enable:
Select “Allow connections only from computers running Remote Desktop with Network Level Authentication”.
It’s not a necessity to require Network Level Authentication, but doing so makes your computer more secure by protecting you from Man in the Middle attacks.
Systems even as old as Windows XP can connect to hosts with Network Level Authentication, so there’s no reason not to use it.
You may get a warning about your power options when you enable Remote Desktop:
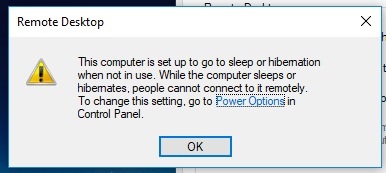
If so, make sure you click the link to Power Options and configure your computer so it doesn’t fall asleep or hibernate.
Select users to connect remotely to your PC
It is always a good idea to set up a separate standard level user account for Remote Desktop Connections.
The “Remote Desktop Users” window is the place from which you can permit other user accounts to connect via Remote Desktop Connections.
This applies to all modern Windows operating systems.
This is regardless of whether you use Windows 10, Windows 7 or 8.1, and regardless of whether you opened the Remote Desktop Users window from the Settings app or the Control Panel
To add the users to whom you want to give permissions, in the Remote Desktop Users window, click on Add.

In the Select Users window, type the user account name in the box in the next window and click on Check Names.
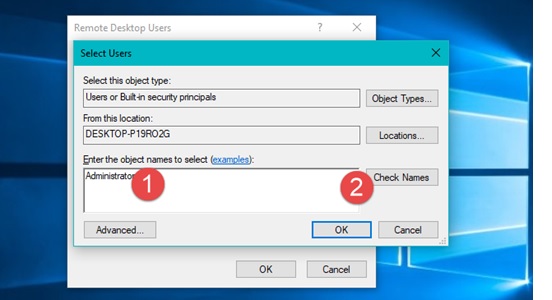
Windows checks that a user account with that name exists and adds the location in front of it, if you are using a local account, or complete the email address if you are using a Microsoft account. When done, click on OK.

You are back to the Remote Desktop Users window. Here, click on OK once more.
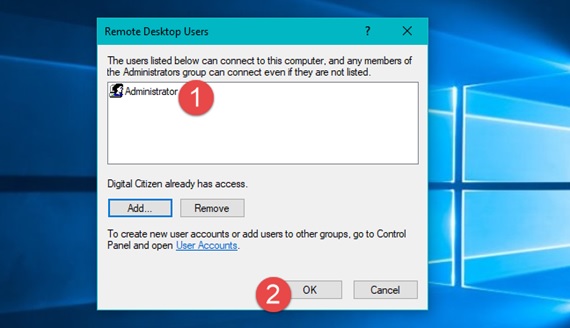
Now, the user you added will be able to connect via Remote Desktop Connection to your computer with his or her login credentials.
After completing the above steps, users can connect remotely to your Windows computer, provided that your computer is powered on and connected to a network.
You can start a remote connection from those computers by clicking Start, typing “remote,” and then choosing the “Remote Desktop Connection” result.
Just type in the name or IP address for the PC to initiate the connection.

This is useful for both systems administrators and technical support teams as well as end users, who may want to access their work computers from home or vice-versa.
Watch the video for more insights on Remote Desktop Connection
[ot-video][/ot-video]